12 — User Management
User Management is the central control panel for creating and maintaining Regnify user accounts. System administrators and organisation administrators use this page to onboard new staff, assign roles, and manage account lifecycle states — active, suspended, or locked.
Access required: SYS_ADMIN, ORG_ADMIN
Route: /users
12.1 Viewing the User List
Navigate to User Management from the left sidebar. The page loads a filterable table of all users in the system.
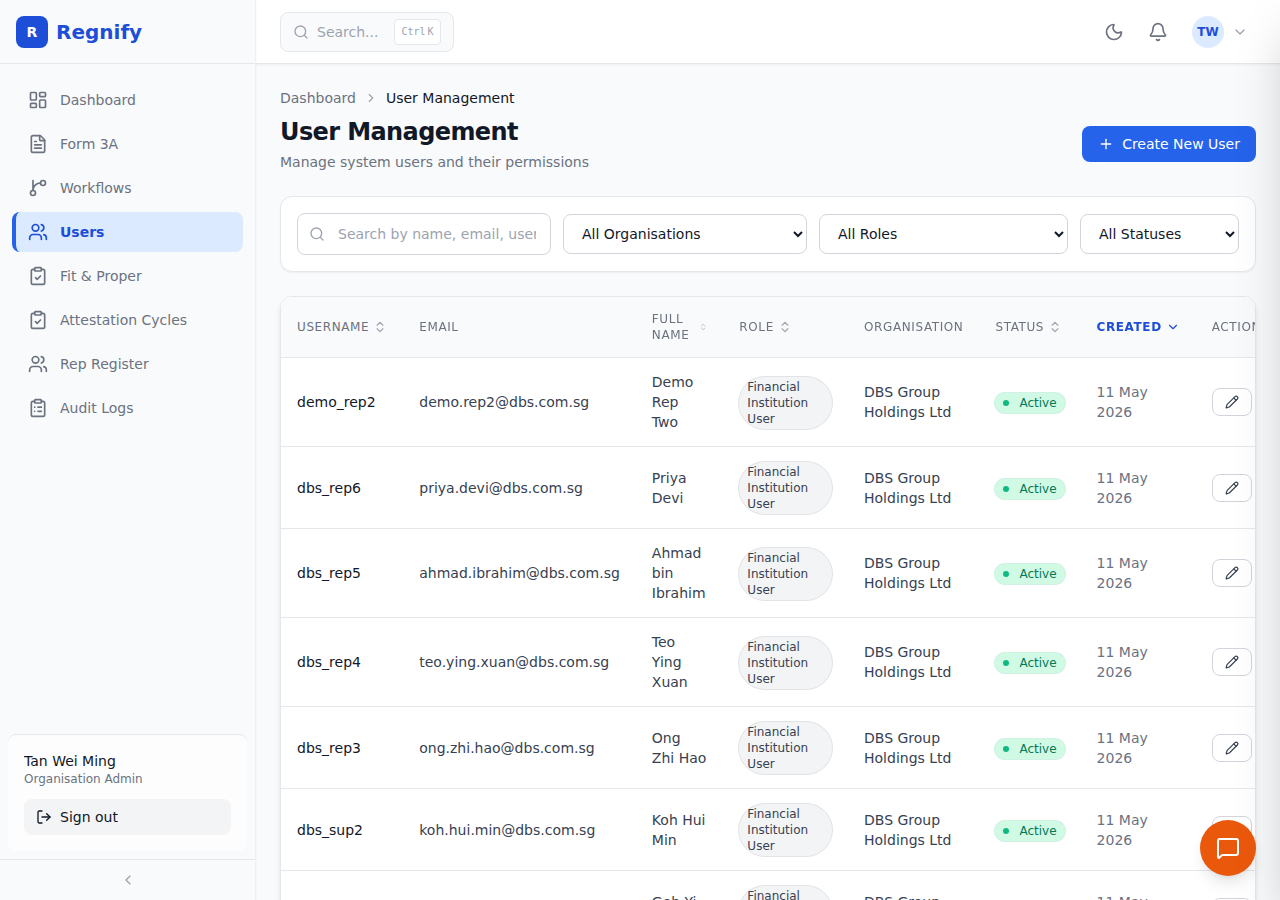 The user list with filter bar and sortable columns. Visible here: dbs_rep2, dbs_rep6 (Priya Devi), dbs_rep5 (Ahmad), and others across multiple organisations.
Table Columns
| Column | Description |
|---|---|
| Username | The login identifier used with Keycloak SSO. Sortable. |
| The user's email address. | |
| Full Name | The user's display name. Sortable. |
| Role | The system role badge (colour-coded by role type). Sortable. |
| Organisation | The Financial Institution (FI) the user belongs to, or -- if unassigned. |
| Status | Account status indicator: Active (green), Suspended (red), or Locked (amber). Sortable. |
| Created | The account creation date in DD MMM YYYY format (Singapore locale). Sortable. |
| Actions | Contextual action buttons: Edit, Suspend/Activate, Unlock (if locked), Delete. |
The table defaults to sorting by Created date, newest first. Click any underlined column header to change the sort key or toggle ascending/descending order.
12.2 Filtering and Searching
The filter bar above the table provides four independent filters that combine:
- Search box — Free-text search across username, email address, and full name simultaneously. Results update as you type.
- Organisation dropdown — Filter to users belonging to a specific FI. Defaults to "All Organisations".
- Role dropdown — Filter to a single role. Defaults to "All Roles".
- Status dropdown — Filter by account state: Active, Suspended, or Locked. Defaults to "All Statuses".
Filters can be combined. For example, selecting Role = HR_ADMIN and Status = Suspended shows only suspended HR administrators across all organisations.
12.3 Creating a User
Prerequisites: You must be logged in as SYS_ADMIN or ORG_ADMIN.
- Click Create New User in the top-right corner of the page header.
- The Create New User modal opens.
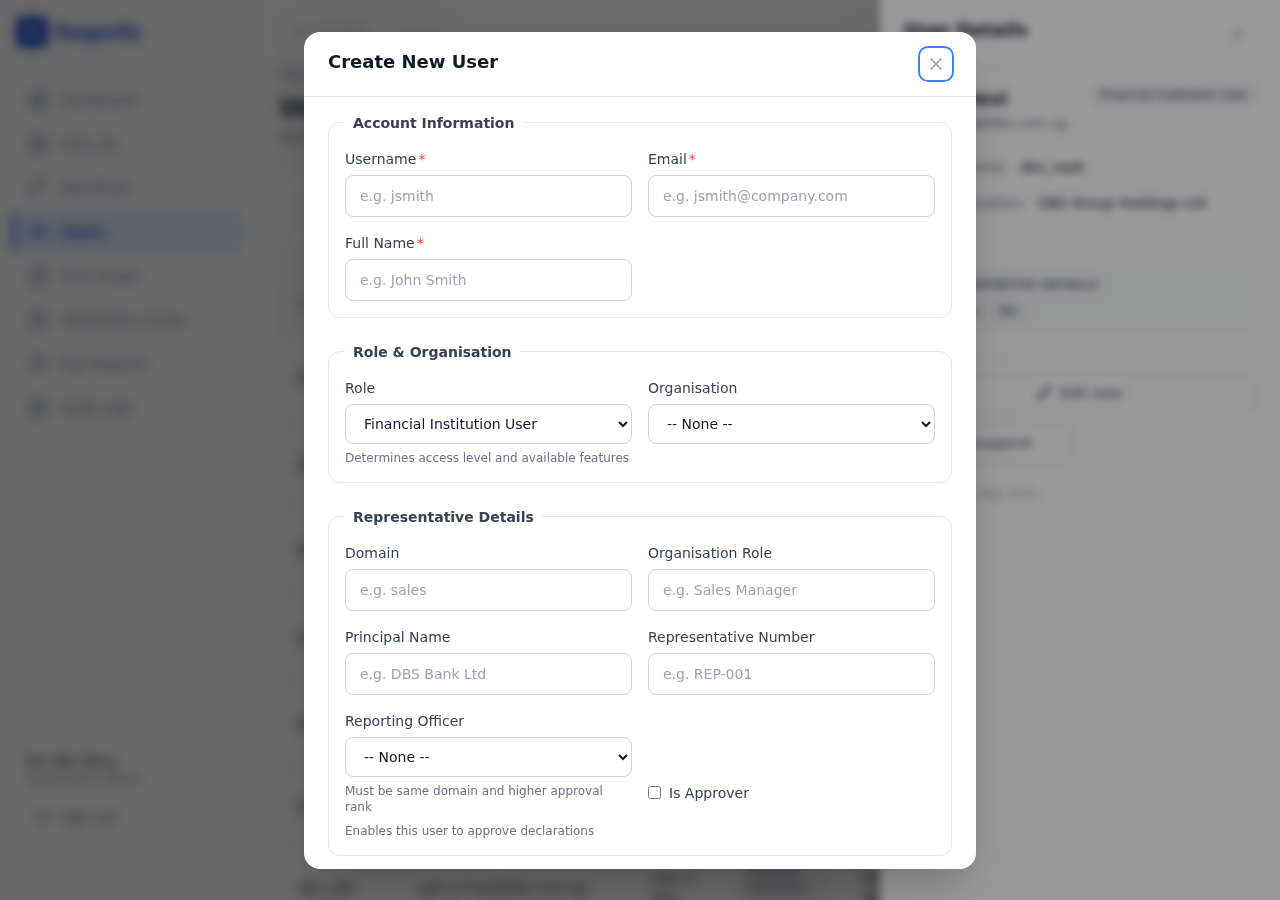 The Create New User modal showing Account Information, Role & Organisation, and Representative Details sections.
- Fill in the required fields:
Account Information
| Field | Required | Notes |
|---|---|---|
| Username | Yes | Must be unique. Used as the Keycloak login identifier. Example: dbs_rep3 |
| Yes | Valid email address. Used for notifications. | |
| Full Name | Yes | The user's display name shown throughout the system. |
Role & Organisation
| Field | Required | Notes |
|---|---|---|
| Role | Yes | Select one of the six system roles (see Section 12.4 for descriptions). Defaults to Financial Institution User. |
| Organisation | No | Assign the user to an FI. Select "-- None --" for platform-level accounts (e.g. SYS_ADMIN). |
Representative Details (visible for all roles; most relevant for FI_USER)
| Field | Required | Notes |
|---|---|---|
| Domain | No | The business unit the representative operates under within the FI (e.g. Capital Markets, Wealth Management). |
| Organisation Role | No | The user's internal job title or rank within the FI (e.g. Relationship Manager, Supervisor). |
| Principal Name | No | The name of the principal representative this user reports to, if applicable. |
| Representative Number | No | The MAS-assigned representative number for appointed representatives. |
| Reporting Officer | No | Dropdown selecting the user's direct reporting officer from existing users. The reporting officer must have a higher approval rank and isApprover = true. |
| Is Approver | No | Checkbox. When checked, this user is eligible to be assigned as an approver step in workflow templates and can be selected as a reporting officer for other users. |
- Click Save. A success toast confirms the user was created.
Note: Creating a user in Regnify creates the database record. To complete onboarding, the user's Keycloak account must also exist with a matching username. For production deployments, use the Keycloak Admin Console at
https://regnify.regnify.dev/keycloak/admin/to create the identity. See the Keycloak documentation for password setup.
Error Conditions
- If a user with the same username already exists, the API returns an error and a red toast notification is shown. Choose a different username.
- If a required field (Username, Email, Full Name) is left empty, the form will not submit and the field will be highlighted.
12.4 User Roles Explained
Regnify uses six distinct roles. Each role determines which pages a user can access and what actions they can take.
| Role | Display Name | Badge Colour | Description |
|---|---|---|---|
SYS_ADMIN |
System Administrator | Red | Full access to all platform features. Manages organisations, all users, audit logs, and platform settings. Typically Regnify staff. |
ORG_ADMIN |
Organisation Admin | Blue | Manages users and settings within their assigned FI. Access to user management, organisation details, workflow templates, and audit logs. |
HR_ADMIN |
Human Resources | Amber | Manages workflow templates and reviews declarations from an HR perspective. Access to workflow management and the Rep Register. |
COMP |
Compliance | Green | Reviews and approves declarations at the compliance step. Access to MAS Approval Console, attestation cycles, and Rep Register. |
FI_USER |
Financial Institution User | Grey | Representatives and approvers within an FI. Submit Form 3A declarations, approve workflow steps (if isApprover = true), and view their own declarations. |
REP_USER |
Representative | Grey | Access to the Rep Portal only (/rep). Views their own passport, CPD log, attestations, and incidents. Cannot access the main admin interface. |
Note:
REP_USERcannot be assigned via the User Management form. It must be assigned directly in the Keycloak Admin Console athttps://regnify.regnify.dev/keycloak/admin/→ Realmregnify→ Users → select the user → Role Mappings tab → assign theREP_USERclient role.
12.5 Assigning Organisations
The Organisation dropdown in the user form lists every active organisation registered in Regnify. Assigning an organisation:
- Links the user's account to that FI's data scope.
- Makes the user appear in the member count on the Organisation Management page.
- Controls which declarations and workflows the user can see (users only see data for their own organisation, unless they hold
SYS_ADMIN).
A user can belong to only one organisation at a time. To reassign a user to a different FI, edit the user and select the new organisation.
Selecting "-- None --" leaves the user without an organisation assignment. This is appropriate for SYS_ADMIN accounts that need cross-organisation access.
12.6 Editing a User
- In the user table, click the pencil icon (Edit) in the Actions column for the target user.
- The Edit User modal opens with the user's current values pre-filled.
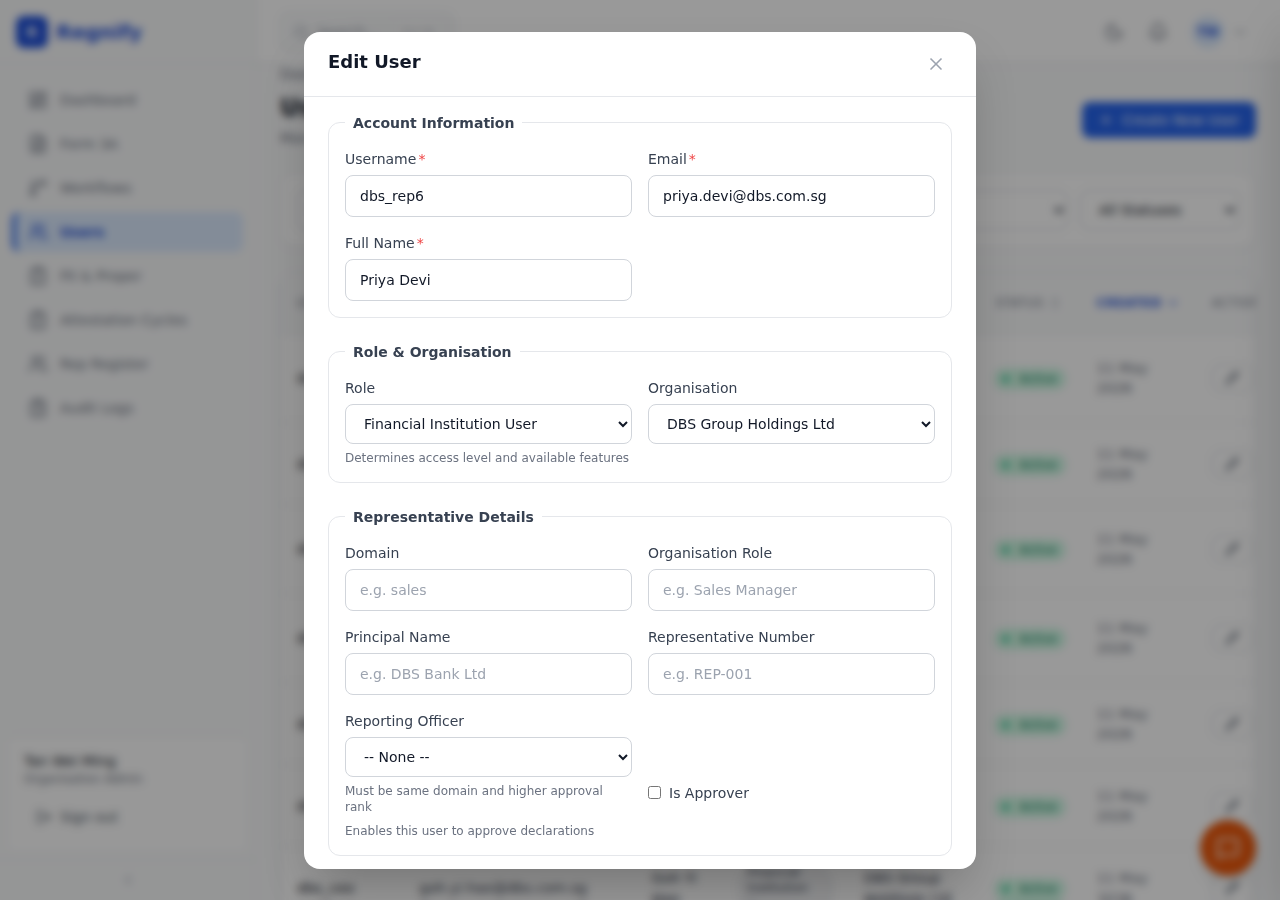 The Edit User modal pre-filled with dbs_rep6 / priya.devi@dbs.com.sg / Priya Devi.
- Modify the desired fields. The following fields can be changed:
- Username — exercise caution: changing a username will break Keycloak login if the Keycloak identity is not also updated.
- Full Name
- Role
- Organisation
- Domain
- Organisation Role
- Principal Name
- Representative Number
- Reporting Officer
-
Is Approver checkbox
-
Click Save. A success toast confirms the update.
Note: Changing a user's role takes effect immediately on their next page load. If the user is currently logged in, they will see the new permissions on their next navigation action.
12.7 Suspending a User
Suspending a user prevents them from logging in. Their existing data (declarations, audit logs) is preserved. Use suspension for temporary access removal, such as when a representative is under investigation or has left the organisation.
Precondition: The user must be in Active status.
- Locate the user in the table.
- Click the ban icon (Suspend) in the Actions column.
- The system immediately suspends the account. The Status badge changes to Suspended (red dot).
The suspended user's next login attempt will be refused by the backend. Any active sessions may remain valid until they expire; Keycloak session termination must be performed separately in the Keycloak Admin Console if immediate revocation is required.
What the suspended user sees: When a suspended user attempts to log in, Keycloak displays an "Account is disabled" error on the login page and refuses the session. They cannot access Regnify until their account is reactivated by an administrator.
For immediate session termination: Navigate to the Keycloak Admin Console → Realm regnify → Users → locate the user → Sessions tab → Sign out all active sessions. This invalidates any currently open browser sessions immediately rather than waiting for token expiry.
12.8 Activating a User
Reactivates a previously suspended account, restoring the user's ability to log in.
Precondition: The user must be in Suspended status.
- Locate the user in the table. The Status badge shows Suspended (red dot).
- Click the check-circle icon (Activate) in the Actions column.
- The system restores the account to Active status. The Status badge changes to Active (green dot).
Note: Activating a user in Regnify restores their database access flag. Ensure their Keycloak account is also enabled if it was separately disabled. Both conditions must be true for the user to log in successfully.
12.9 Unlocking a User
A user account enters Locked status after a configurable number of failed login attempts (managed by Keycloak's brute-force protection policy). Locked users cannot log in until an administrator unlocks them.
Precondition: The user must be in Locked status. The Unlock button only appears in the Actions column when the account is locked.
- Locate the user — the Status badge shows Locked (amber dot).
- Click the unlock icon (Unlock) in the Actions column.
- The account lock is cleared. The Status badge returns to Active (green dot).
12.10 Password Management
Regnify does not provide a password reset UI within the User Management page. Passwords are managed entirely through Keycloak.
To reset a user's password:
-
Via Admin Console: Navigate to
https://regnify.regnify.dev/keycloak/admin/→ Realmregnify→ Users → locate the user → Credentials tab → Set Password. -
Via API (for scripted resets):
KC_URL="https://regnify.regnify.dev/keycloak"
TOKEN=$(curl -sk -X POST "${KC_URL}/realms/master/protocol/openid-connect/token" \
  -d "client_id=admin-cli" -d "username=admin" -d "password=admin" \
  -d "grant_type=password" \
  | python3 -c "import sys,json; print(json.load(sys.stdin)['access_token'])")
curl -sk -X PUT -H "Authorization: Bearer $TOKEN" -H "Content-Type: application/json" \
  "${KC_URL}/admin/realms/regnify/users/{USER_ID}/reset-password" \
  -d '{"type":"password","value":"Regnify@2026","temporary":false}'
Password policy: Keycloak enforces a minimum of 8 characters, at least one uppercase letter, one lowercase letter, one digit, and one special character. Use @, #, -, _, or . as special characters in shell scripts — avoid $, !, and backticks, which are corrupted by shell expansion.
12.11 Deleting a User
- Click the trash icon (Delete) in the Actions column for the target user.
- A browser confirmation dialog asks: "Delete this user?"
- Click OK to confirm. The user record is permanently removed from the Regnify database.
Warning: Deleting a user is irreversible. Their associated audit log entries are retained (referenced by name, not foreign key), but their declarations and workflow steps will lose the user association. Before deleting, consider suspending the user instead to preserve data integrity.
After deletion, manually remove the corresponding Keycloak account from the Admin Console to prevent orphaned identity records.